Teslas have the ability to automatically open your garage door as you’re approaching your home. They can also automatically close it as you’re leaving.
They do this by combining the GPS signal with the HomeLink module that opens your garage door.
How to Tell If Your Tesla Has HomeLink
All Teslas are capable of opening garage doors using HomeLink, however not every Tesla comes equipped with the HomeLink module.
If you have a Model S or Model X, then your car already has the capability to open your garage door.
If you have another model, then whether it’s included in your car will vary. Model 3s included HomeLink only up until Spring of 2019. It then became an option that would be installed after delivery through Tesla service. All Model Ys do not have it installed unless it was installed after delivery.
However, the easiest way to tell if your car has a garage door opener is to check on the car’s display. You can go to Controls > Software then tap on Additional Vehicle Information.
This will bring up a screen that will display several important details about your vehicle and the hardware it includes.
The screen will display which full self-driving computer hardware is installed, your infotainment processor and more. It will also display whether you have the HomeLink garage door opener hardware installed.
Next to ‘Garage door opener’, you will either see ‘Not installed,’ or ‘HomeLink 5 (Opt 2).’ The number may vary, but it will mean that you have the HomeLink module installed and your car is capable of opening garage doors.
Program HomeLink Garage Door Opener
If you have a garage door opener in your Tesla, then you can program the car to automatically open the garage door when you pull up to the house.
You can also operate the doors individually through the car’s interface and even operate the main garage door through the Tesla app.
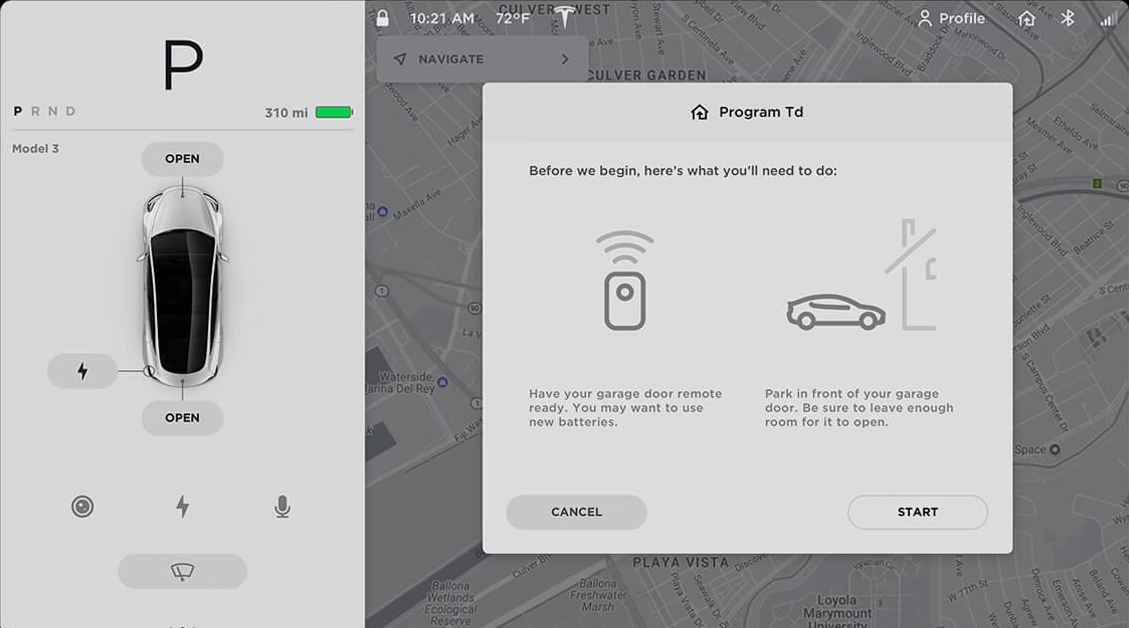
To program your car you’ll need the remote that came with your garage door opener, or easy access to the garage door motor in your garage.
If you’re programming the car using the button on the garage door opener motor, make sure you have plenty of space and a good step ladder because you’ll need to complete the operation in a certain amount of time. If someone is available to help, that will make the process much easier.
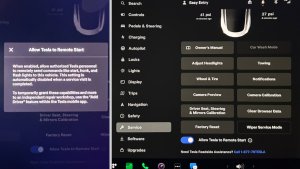
To get started you’ll tap on the HomeLink icon along the top of your Tesla’s screen that looks like a house with an arrow then tap HomeLink Settings.
This brings up the HomeLink screen which allows you to add various garage doors or compatible accessories such as lights or gates.
Start by tapping on Add New HomeLink then enter a name for this garage door, such as ‘Left Garage’ and then tap Create HomeLink.
Standard Mode or D-Mode
You’ll next be presented to set the HomeLink transmit mode. The mode you need to pick will depend on your location and method you’re using to program your car.
Standard Mode - This is the most common mode. If you’re unsure of which to use, you should start with this one, as it’s the simplest to set up. This option requires the use of your garage door remote.
D-Mode - D-mode is usually used in North America. You’ll want to use D-mode if you’re using the ‘Learn’ or ‘Smart’ button on your garage door opener motor.
UR-Mode - UR-mode is similar to D-mode but it’s a standard that’s usually found in Europe, the Middle East and Asia. It’ll also require you to use the ‘Learn’ button on your garage door opener motor.
Set your preferred mode and tap Set Mode.
Next, you’ll want to make sure your car is parked in front of your garage. The car uses this location to determine when to open your garage door when arriving home.
Later you’ll then be able to set how many feet before reaching this location should the car send the signal to open your garage.
Programming With Standard Mode
Get ready to program your car and tap Start. You’ll now want to go outside of your car with your garage door remote and point it at the front bumper closer to the passenger side.
Now press and hold the button that opens your garage door on the remote and keep it pressed. It can take up to 30 seconds to program. Your car’s lights will flash when it’s complete. Keep in mind that your garage door will open or close when you do this, so make sure there is nothing in the way.
Once you see your headlights flash, that means the car was successfully able to record the signal from your remote.
When you go back in your vehicle you should see that the recording was completed and you’re prompted to tap next to continue.
If you’re using Standard Mode, the next step will vary depending on whether your remote is QuickTrain compatible or not.
If your remote is QuickTrain compatible or doesn’t use a rolling code then you can tap Continue, if it’s not either of those, then you’ll be required to press the ‘Learn’ button on your garage door opener motor.
If you’re not sure, you can try pressing continue and see if HomeLink works. If it doesn’t work then you know your remote is not QuickTrain compatible.
Programming With D-Mode or UR-Mode
If you’re using D-Mode or UR-Mode to program your car you will need easy access to the garage door opener motor.
The car will ask you to press the Learn or Smart button on the garage door motor. It’ll be a small button that may be behind a cover or door. It’s usually a bright color such as orange, red, yellow or purple, but it can be any color.
After pressing the button you will need to go back to the car in a short period of time and tap continue. This is to prevent unauthorized use of your garage door.
Testing the Button
After programming your garage door the car will ask you to test it.
The car will have you test the garage door button in the car to see if it works and you’ll be given a chance to go back and choose a different option if it didn’t work the first time.
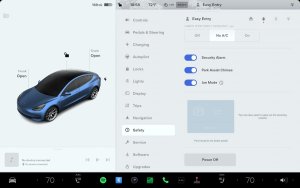
Once you have your garage doors opening from the car and tap save, you can set various options for the garage door.
Auto Fold Mirrors
This option will cause your car to fold its mirrors right before arriving at your garage. Keep in mind this may make backing out of your garage a little more difficult. Only use this option if you need to.
Auto Open When Arriving
Teslas will combine your GPS signal with your HomeLink transmitter and auto open your garage doors as you’re approaching your house.
This is a really convenient feature and I’d recommend having it on as long as your garage door has the safety sensors at the bottom that will prevent it from closing if anything is in the way.
You can also choose the number of feet away from your garage when the car should send the signal to open it.
It’s nice to have your garage door fully open before you get to it so that you don’t need to stop and wait. However, the number of feet that is right for you will depend on your garage door opener and how far away it could receive a signal.
I’d also recommend having your garage door in view so that for those rare times when you come home and the garage door is already open. This will cause your car to send another ‘open’ signal, causing your garage door to start closing.
It's important to understand that the car has no way to know whether your garage door is open or closed, and unfortunately HomeLink simply sends an "open/close" signal, which causes the garage door to open if it’s closed or close if it’s opened. Some caution is necessary, but the feature works well, especially when you’re arriving home.
Tesla recommends only using the auto-open or auto-close features when your garage door is installed with safety sensors along the bottom.
Keep in mind that the car determines the location of your garage door based on where your car was when you programmed the garage door. The location can be reset at any time.
Auto Close When Leaving
This is the opposite of ‘Auto Open when Arriving’. Your car will automatically send a signal to close your garage door when you’re leaving home.
We do need to be cautious with these features as they’re not discrete open and close signals and they just tell the garage door to switch position.
Reset Location
If you weren’t in front of your garage door when you programmed it, then your car has the wrong location for your garage door. Choosing ‘reset location’ when in front of your garage door will cause the car to change the location of your garage to its current position.
You’ll need to do this for each garage door.
Chime for Auto-Open and Auto-Close
On the HomeLink settings screen you can also set whether you’d like the car to chime before auto opening or auto closing the garage door.
This will have the car make a short ding sound before auto opening or auto closing your garage doors. It’s a little reminder that the garage door is open to move. It also gives you a chance to cancel the auto opening or auto closing procedure before it starts. You’ll see the HomeLink menu come up with a cancel button when this happens.
Limited to 3 Garages or Devices
The HomeLink module that Tesla uses is limited to three HomeLink devices. Unfortunately, this is a limitation of the module itself and not something that Tesla can change.
Add or Install Garage Door Opener in Your Tesla
If you have a Tesla Model 3 or Model Y that does not have the garage door opener, then you can purchase it separately directly from Tesla.
Unfortunately, it can’t be purchased when you buy the car and it needs to be bought and installed by Tesla service after delivery.
The cost for the parts and installation are $325.
If Tesla offers mobile service in your area then it's a convenient and painless process.
Set Which Garage Door Opens In App
In the Tesla app there is a HomeLink icon that will open your garage door. Unfortunately, this button can only be assigned to one garage door.
There is no way to have your Tesla open the other garage doors programmed in the vehicle, however you can pick which garage door to open when you press the HomeLink icon in the Tesla app.
The following procedure requires you to have Enhanced Autopilot (EAP) or FSD. If you go in your car and go to Controls > Autopilot then tap on Summon you’ll be presented with Summon details.
To choose your garage door, tap HomeLink then pick your garage door. You can then turn HomeLink off again. Keep in mind that if you use Summon with HomeLink enabled then you are telling the car which garage door to open before backing out of the garage.
If you do not have EAP or FSD, then you may have to change the order of your garage doors in order to change the one that opens when pressing the HomeLink icon.
Subscribe
Subscribe to our newsletter to stay up to date on the latest Tesla news, upcoming features and software updates.
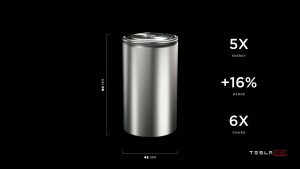
Tesla’s autonomy stack has been one of the primary focuses of Tesla’s earnings calls for quite some time. It is also crucial to achieving Tesla’s larger ambitions, such as its robotaxi network and humanoid robots like Optimus.
Now, with FSD Unsupervised being prepared for the robotaxi launch in June, there’s a lot of new information being shared by Tesla on what to expect.
FSD Supervised
The version currently available to customers, FSD Supervised, has been available since its rebranding with the launch of FSD V12 last year. However, it has been a while since we saw an update - in fact, over 100 days since the last public FSD update.
Tesla has been gathering and processing data at an unprecedented rate. In the shareholder’s deck, Tesla revealed that there had been over 7.7 million miles driven per day this past quarter in North America and China. Tesla’s recently deployed Dojo units are likely running at full tilt doing automated data labelling.
The launch in China earlier this year was the first launch of FSD outside of North America. Most interestingly, Tesla conducted that launch without any region-specific training data besides videos found online. Tesla needed to find a workaround, as Chinese data cannot be uploaded outside the country's physical boundaries due to local regulations.
FSD for Europe remains in the wings - Tesla is awaiting regulatory approval and appears hopeful that it will be able to begin deploying FSD Supervised in Europe before the end of 2025. That may be an optimistic goal, especially considering Tesla is facing additional regulatory delays. With UNECE regulators not addressing autonomy in the next several meetings, Tesla will rely on per-country exemptions, starting in the Netherlands.
FSD to Feature Region-Specific Parameters
While FSD continues to expand, Tesla has acknowledged that certain conditions, like snow, are posing difficulties. They intend to increase the comfort and safety level of driving in inclement or locale-specific conditions in the future by adding parameters that are explicitly trained on those types of conditions and regions.
Tesla’s team specifically mentioned that these new parameters aren’t a legal necessity to get FSD Unsupervised or Supervised approved but will instead increase reliability and comfort for users. They also addressed concerns about sun glare, sand, dust, and fog impacting road conditions.
With sun glare in particular, as Tesla uses a photon-count analysis before processing the digital signal, its cameras are not as blinded as they may appear on-screen. FSD performs its analysis before the data is turned into an image, meaning that it can still perceive things even when a human may not be able to from the camera feed.
FSD Price Changes
Tesla’s executive team also raised an interesting point, but one we’ve heard before in 2023. As FSD’s capabilities evolve and increase, they believe that pricing will also be subject to change. The value of FSD, once it is fully Unsupervised, will rise greatly, and the current subscription option is far too inexpensive, according to Tesla.
It appears that Tesla is considering different pricing options for FSD Unsupervised in the future, but for now, the $99 monthly subscription remains in place. It’s possible we may see different prices for FSD Supervised versus FSD Unsupervised.
Ongoing Challenges
Tesla’s current challenges with working on FSD can be described as the march of nines. This is the exponentially increasing work needed as you need to take the system closer and closer to 100%.
Validation primarily remains a challenge due to the difficulty of encountering and then solving edge cases. The internal QA fleet in Austin can operate for multiple days without a single intervention, making it challenging to measure the progression and regression.
Tesla noted that, on average, an intervention is currently required every 10,000 miles. That is equivalent to the average North American driving for an entire year. Therefore, a substantial amount of data is necessary to continue improving the current issues. With 7.7 million miles driven by FSD every day, Tesla has, on average, 770 events to review each day.
Tesla is also continuing to deploy and expand its AI training centers. Cortex, Tesla’s latest, is already online at Giga Texas and crunching through immense amounts of data to train FSD.
FSD Unsupervised
The ultimate goal, of course, is FSD Unsupervised. A fully autonomous experience that can take you from Point A to Point B without needing any human supervision or intervention at all.
Tesla has already deployed FSD Unsupervised to take its Model 3, Model Y, and Cybertrucks from the production line to the outbound lot at both Giga Texas and Fremont, saving considerable man-hours. These vehicles are also autonomously interacting with traffic on their way over to the outbound lot - and it’s an expression of Tesla’s confidence in the system.
Fleet Capabilities
Tesla also mentioned that the vast majority of its fleet on the roads today will be capable of FSD Unsupervised. In particular, Elon mentioned the Model S, 3, X, and Y. Interestingly, this is the fourth event (We, Robot, Q4 Earnings 2024, All-Hands, and Q1 Earnings 2025) without mention of the Cybertruck being capable, likely meaning that FSD development for the Cybertruck is further behind as we’ve seen.
Hardware 3 Retrofit
There was no mention of the limitations of Hardware 3 or Tesla’s exact plans for a future retrofit at this time. While Tesla has already promised to replace HW3 with a future iteration of an AI computer, as we haven’t seen any FSD updates recently, so it’s hard to say whether any future FSD updates will arrive for HW3 besides bug fixes.
We believe Tesla is planning to solve FSD first and then work backward from there. At this point, they’ll know the compute power required for FSD Unsupervised and could make a retrofit that fits into a hardware 3 vehicle with the power and space constraints it imposes.
Unsupervised for Customers
Tesla’s goal is to launch FSD Unsupervised for customers ideally by the end of 2025. The executive team specifically mentioned that their key restrictions are twofold here.
One is that they need to be sure that FSD Unsupervised is meaningfully safer (10x, as per Q4 2024) than a human driver. Tesla has a focus on safety and intends to be extremely careful with the rollout of Unsupervised to ensure there are no incidents or accidents.
The second is that regulatory approvals will continue to be a limitation. However, as more cities and states begin to approve FSD Unsupervised in their locales, Tesla will be able to roll it out faster and faster. The intent is to have FSD Unsupervised available throughout the United States by the second half of 2026, according to Tesla.
Tesla also confirmed their intent to have a Model Y deliver itself from Giga Texas or Fremont to a customer by the end of 2025. This will likely be a local customer, and we did a deep-dive into the potential advantages and disadvantages of this delivery method.
While it may be a slow period for FSD updates right now, there are a lot of changes happening this year with the launch of FSD Unsupervised, the robotaxi network and the expansion to Europe.
Tesla’s 2025 Spring Update has arrived and is now going out in larger waves. Although this update isn’t as large as last year’s Spring Update, there are several exciting features in this year’s Spring Update.
In this article, we’ll take our first look into some of the newest features.
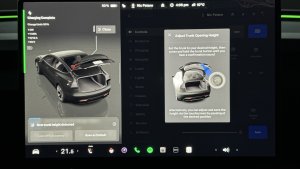
Custom Trunk Height per Location
The trunk height for Model Ys, Model 3s with automatic trunks, and the 2021+ Model S and Model X will now be customizable by location. While you could previously apply a maximum general height, you can now also apply a height at a given location.
This is especially helpful if you don’t want the vehicle to open the trunk all the way in your garage, but would like it to open all the way elsewhere.
To set it, you can manually adjust the liftgate to your preferred height when at the location and then press and hold the trunk close button until you hear a chime. Alternatively, you can open the liftgate with the on-screen controls and then press the pause button and have it remember this height.
If you have a Cybertruck, the process is similar to save the frunk height.
B-Pillar Sentry & Dashcam
The new B-Pillar options are displayed at the bottom of the dashcam viewer.
Not a Tesla App
For newer hardware 4 vehicles, Sentry Mode and Dashcam will now also record video from the B-pillar cameras on your vehicle. This brings the total number of cameras recorded to six, up from just four. This also means that the vehicle is now covered practically in 360 degrees. The only cameras not recorded are the alternative front camera, the front bumper camera (on the new Model Y and Cybertruck for now), and the interior camera.
While most of the other cameras wouldn’t provide much improvements in terms of security, adding the interior camera would be a really nice addition. However, we imagine there are privacy reasons why Tesla isn’t adding this one.
You can check out the new angles in the improved Dashcam viewer under “Left Pillar” and “Right Pillar”, which are located at the far right.
For AI3 vehicles and the Cybertruck, this feature isn’t available, however, we expect it to be added to the Cybertruck soon.
The Dashcam and Sentry Mode Viewer have received an improved interface to go along with the new B-pillar camera recording. However, like the new cameras, this feature is only currently available on HW4 vehicles. While the B-pillar camera records are unlikely to arrive on HW3 vehicles due to technical constraints, we may see this improved Dashcam Viewer arrive on other vehicles in the future.
The new viewer now displays all the cameras along the bottom, rather than having one at each corner.
Tesla has also added a jump back or forward 15-second button; however, the recent improvement to adjust the playback speed from 0.5x, 1x, and 2x appears to have been removed.
There’s also a new button at the top right corner of the video, which lets you easily jump to the next video clip.
Reverse Camera
The new angle is a little bit wider than the original.
Not a Tesla App
For HW4 vehicles, Tesla has also improved the visible angle of the rearview camera. Tesla’s cameras actually capture angles slightly wider than the ones displayed in the vehicle UI and the Tesla app - so it’s nice to see them increasing the viewing area.
These same vehicles have now also been updated to have the fender cameras displayed at the top of the Camera app instead of the bottom.
Adaptive Headlights for North America
Overnight, your Tesla gets better with a OTA update.
Tesla Adaptive Headlights in action on a Legacy Tesla Model Y.
Adaptive headlights have finally been enabled for vehicles with matrix headlights in North America with this Spring Update. You can check them out in action below. If you’re unsure whether your vehicle includes matrix headlights, our guide can help.
Model S / X Turn Signal Cameras
These optionally placed repeater turn signal camera images are a huge improvement!
@niccruzpatane on X
The Model S and Model X have received some much-requested love from Tesla. The blind spot camera feature, which displays the fender cameras on screen when the turn signal is active, is being moved to the instrument cluster.
Until now, the feature has shown the cameras on the infotainment display, much like the Model 3 and Model Y. If you prefer to keep them on the main display, you can adjust it under Controls > Display > Automatic Blind Spot Camera.
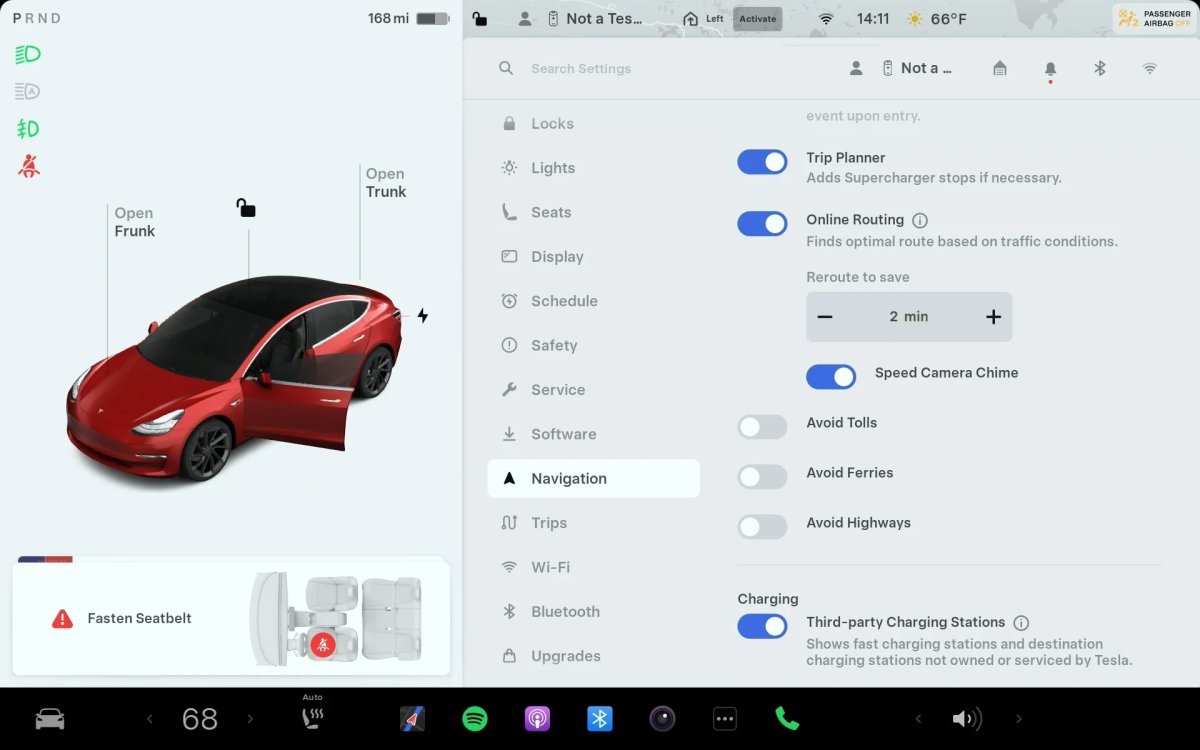
New Navigation Options
With the 2025 Spring Update, you can now customize your route to have fewer stops, the best amenities, or just a fastest overall route.
Tesla added three new routing options to the Spring Update, which now lets you choose between faster and more frequent charging stops or longer and less frequent stops. The long-awaited avoid highways option is finally included in this update as well.
Fastest: This offers the quickest path to the destination, disregarding any attempts at efficiency or stopping more frequently to perform short charges.
Best Amenities & Fewer Stops:This routing mode minimizes your charge stops in exchange for making them longer, but also allows you to stop near highly rated restaurants, shops, and restrooms for a more relaxing trip.
Avoid Highways: Thishighly requested feature allows you to keep your navigation routing away from highways unless absolutely necessary to reach your destination. Hurray for the country roads and relaxed driving.
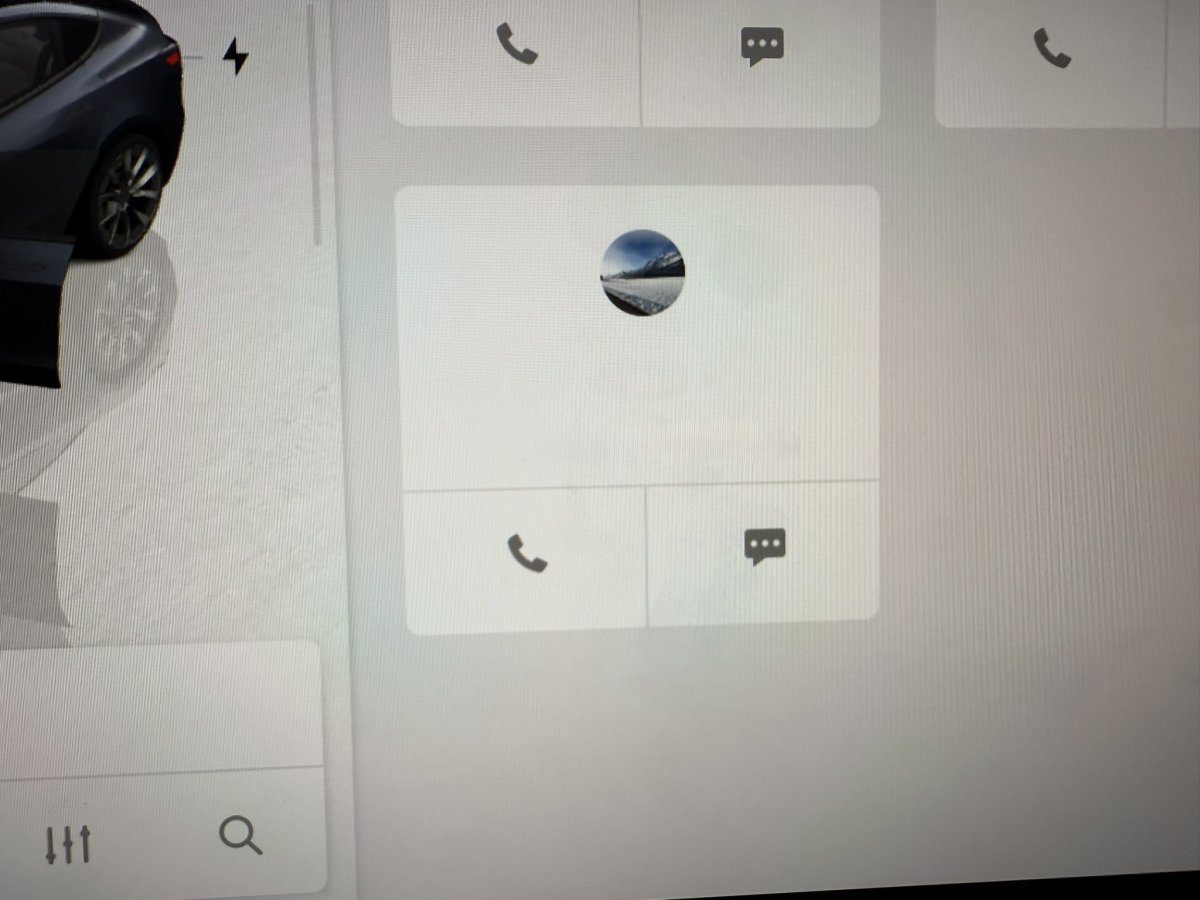
Phone Icon Update
The new contact image is displayed above the phone number and name (censored by user)
@max_bracco on X
Tesla has updated the in-vehicle Phone app to display contact pictures from your phone, along with the name and phone number.
The new contact photos will also appear in the dialog window that opens when you receive an incoming call.
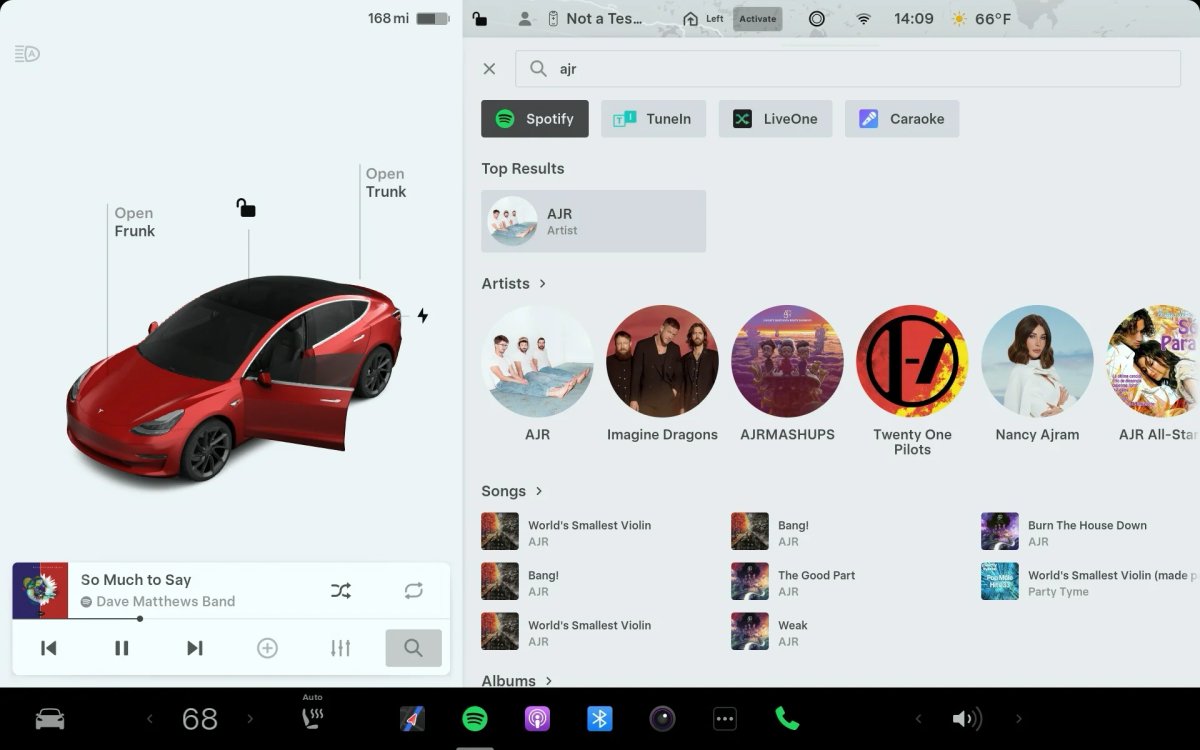
Search Filters for Music
The list of sources is selectable to help fine-tune your search.
Not a Tesla App
When searching for music, the results are now filtered by the music service, rather than displaying all results in a single view.
When you prefer a search, the results will be limited to the currently selected music source. Results for other services will be displayed in separate tabs organized by service. This is a really nice addition, but we’d also love to see an “All” results tab, similar to the previous experience, that lets you view results across various services.
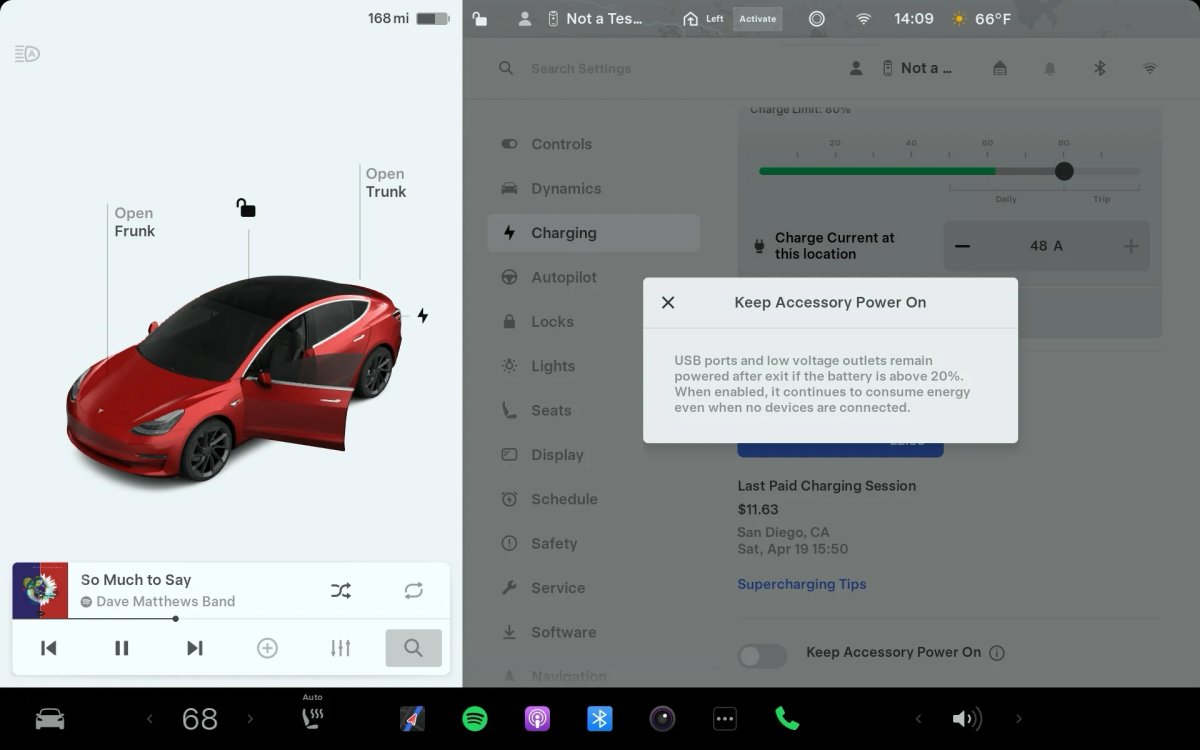
Keep Accessory Power On
Not a Tesla App
Tesla is finally giving users the ability to charge devices with 12V sockets and USB ports when there’s no one in the vehicle. While 12V sockets and USB ports are turned off when the vehicle goes to sleep, many users work around this by enabling Sentry Mode to keep the ports powered.
The good news is that this new feature is even more efficient than before because owners no longer need to keep Sentry Mode on just to keep these ports powered.
To enable power for the USB ports and 12V sockets, navigate to Controls > Charging and scroll down to Keep Accessory Power On. Keep in mind, similar to Sentry Mode, this feature uses additional energy, even if devices aren’t being charged — so use it selectively.
Music Improvements
Tesla has made several other music-related improvements in this update besides the updated search results screen.
Amazon Music: You no longer need a premium subscription to Amazon Music to use the streaming service in the car. Your free account will work just fine.
Apple Music: Apple Music’s shuffle function has been improved so that it now shuffles the entire playlist of music, instead of just the first 100 results in the playlist.
YouTube Music: The next song in a playlist will now be displayed in the Up Next section. You view this section by tapping on the album artwork in the music player.
Other Improvements
Not a Tesla App
Tesla has made several other improvements. One nice addition, currently limited to the Cybertruck, is that the vehicle's visualization will now display the actual distance a door is open.
Tesla also improved the hotspot feature. If you typically use the hotspot on your phone to connect to the vehicle, this feature will now be automatically enabled each time the vehicle is put into drive.
While Tesla has already shown third-party chargers in Europe, Tesla is now giving users the ability to view them in other regions for the first time. The feature is off by default, but you can go to Controls > Navigation and enable third-party chargers. Tesla explains that your vehicle will not automatically navigate to these chargers, but they will show up in the list of available chargers.
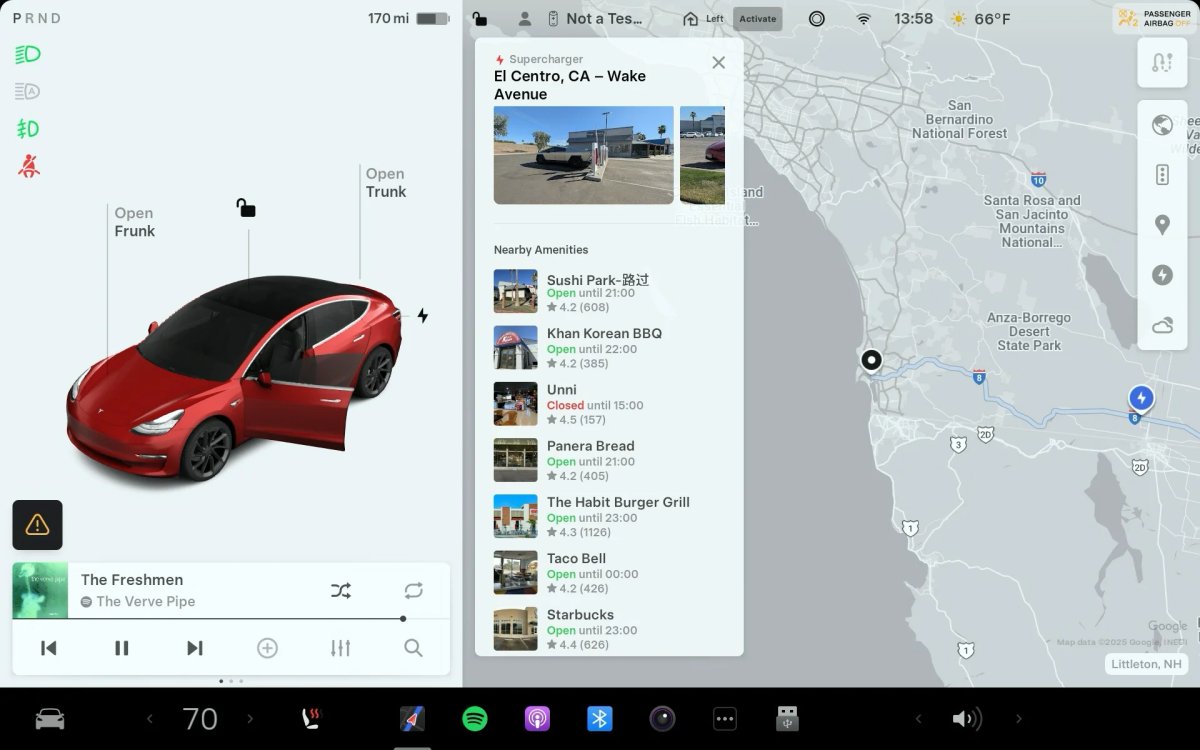
When viewing a Supercharger, Tesla now provides a list of all nearby amenities as well, making it easier to see places nearby.
Not a Tesla App
While this update’s big features are the Sentry Mode and Dashcam Viewer improvements, which don’t apply to everyone, there are a lot of smaller charging and music improvements that make using and charging the vehicle better. Hopefully, we’ll see Grok come in Tesla’s next major update.


![Tesla's 2025 Q1 Earnings Call: How to Listen [Listen to Replay]](https://www.notateslaapp.com/img/containers/article_images/multiple-models/group_81.jpg/b2695a53b51e4c7927802deba2534b09/group_81.jpg)

_300w.png)
![Tesla’s Hollywood Diner: In-Car Controls & Theater Screens Turned On [VIDEO]](https://www.notateslaapp.com/img/containers/article_images/2025/tesla-diner.webp/3aaa2ea0edf2eaa0fabe1217530f3476/tesla-diner.jpg)