Tesla’s battery health and longevity have recently been revealed to be quite good as shown in their latest Impact Report. However, on rare occasions, you may still encounter problems or degradation, and it is worth knowing how to self-diagnose potential issues without needing to reach out to Tesla Service, at least as a first step.
Tesla offers two ways to test your vehicle’s battery health. One is a quick self-test that highlights any issues, while the other one takes much longer, but offers a detailed view of your battery’s health.
Battery Health Check in the Tesla App
Battery health check in the Tesla app
Not a Tesla App
You can open up your Tesla app and go to the ‘Service’ section on the main screen.
You can then tap “Request Service”, choose “Battery & Charging”, and finally “Range”. If you’re prompted to pick a service center, go ahead and pick any service center first. You’ll then be asked to describe the concern. You can type in “range” or any other text and then tap Next at the bottom.
Keep in mind this is an automated solution and your request won’t actually go to a service center when you tap Next.
The app will perform a quick self-diagnosis to see if your battery is within the normal range of degradation. This is a quick self-test and just lets you know that you’re well within Tesla’s expected battery degradation levels.
Thorough Battery Health Test in Service Mode
If you want a more detailed analysis, you can open Service Mode using our instructions. Navigate to the High Voltage menu and then tap on ‘Health Test’ in the ‘HV Battery’ section.
The battery health test in Service Mode is more in-depth and can take up to 24 hours – or more – depending on your charging setup. You’ll need to be plugged in – and not at a Supercharger.
The slower your means of charging, the longer the test will take. However, expect it to take at least 12 hours at minimum, and more than 48 hours if you’re charging a Long-Range vehicle at a lower amperage.
How the Service Mode Battery Health Test Works
The best time to run the Service Mode test is when your battery is closer to empty, rather than full – otherwise the car will need to spend time wasting energy to drain the battery.
Once it reaches a low enough state of charge, the car will then charge up to 100%. Once that completes, go back to the High Voltage section in Service Mode and the vehicle will display a Battery Health percentage.
According to Tesla, Tesla batteries degrade about 15% after 200k miles (321k km) on average. Much of the degradation is front-loaded, meaning that degradation happens faster when the vehicle is newer and the degradation then tapers off.
Note that running the battery health test should be used sparingly and mostly only if you suspect there may be an issue with your battery. By running the test you’re increasing the number of charge cycles on your battery and thus causing some additional degradation. One time won’t hurt it, but doing it often would not only degrade your battery but also increase your electric bill.
Compare to Others
Average battery retention per Tesla
Not a Tesla App
Below is a chart Tesla shared on the Model 3 and Model Y’s battery retention. It can be used to compare your results to Tesla’s findings.
Tesla recommends keeping the state of charge of your battery between 40%-80%, depending on the vehicle. Vehicles with LFP batteries are recommended to be charged to 100%.
Subscribe
Subscribe to our newsletter to stay up to date on the latest Tesla news, upcoming features and software updates.
Another quarter has passed, and that means it’s time to submit questions and vote for Tesla’s Q2 2025 Earnings Call. While Q1 was a tough quarter for the company, Q2 saw some recovery in sales, although there’s still some work to be done.
However, there’s always a lot to be excited about during Tesla’s Q&A session, where we usually learn a lot about future software improvements and upcoming vehicles. We may hear more about FSD Unsupervised, Robotaxi, or the more affordable vehicle, or its upcoming larger 6-seater Model Y, the Model Y L. Tesla also mentioned a potential FSD price hike back in the Q1 2025 Earnings Call, so that could be something that is brought up as well.
Tesla’s Q2 So Far
Tesla has already released their Q2 2025 Production and Delivery numbers, which were up from Q1 of this year, but still down compared to Q2 last year.
Production
Deliveries
Model 3/Y
396,835
373,728
Model S, X, and Cybertruck
13,409
10,394
Total
410,244
384,122
How to Submit & Vote
Tesla lets shareholders submit a question that will be voted on and may be answered during the Q&A session. To submit your own question or vote on an already submitted question, you’ll need to be a verified shareholder. You can go to Say’s platform and link your brokerage accounts.
Once it is verified, you’ll be able to log in and vote your shares on your own question, or on someone else’s question.
Here’s the link to get started on Say’s Tesla Q&A. You must submit your questions and votes by July 23rd, 2025, at 4:00 PM EDT.
Top Questions So Far
Unsurprisingly, people have already been submitting questions, and here are the top ones so far.
Can you give us some insight how robotaxis have been performing so far and what rate you expect to expand in terms of vehicles, geofence, cities, and supervisors?
What are the key technical and regulatory hurdles still remaining for unsupervised FSD to be available for personal use? Timeline?
What specific factory tasks is Optimus currently performing, and what is the expected timeline for scaling production to enable external sales? How does Tesla envision Optimus contributing to revenue in the next 2–3 years?
Can you provide an update on the development and production timeline for Tesla’s more affordable models? How will these models balance cost reduction with profitability, and what impact do you expect on demand in the current economic climate?
Are there any news for HW3 users getting retrofits or upgrades? Will they get HW4 or some future version of HW5?
When do you anticipate customer vehicles to receive unsupervised FSD?
And here are some other ones we found interesting:
Have any meaningful Optimus milestones changed for this year or next and will thousands of Optimus be performing tasks in Tesla factories by year end?
Are front bumper cameras going to be necessary for unsupervised full self driving? If so, what is the companies plan to retrofit vehicles that do not have them?
Will there be a new AI day to explain the advancements the Autopilot, Optimus, and Dojo/chip teams have made over the past several years. We still do not know much about the HW4.
Earnings Call Details
Tesla will hold its earnings call on Wednesday, July 23rd, at 4:00 PM EDT. It's still early for an access link, but we’ll make sure we have a link up on the site before the earnings call that day.
If you do miss the earnings call, no worries. We will provide a full recap following the call, and we’ll also do some in-depth dives into what was said and what we know.
Tesla’s Summer Update, 2025.26, has finally launched, bringing with it a batch of interesting new features for some, and a bunch of quality-of-life improvements for everyone else.
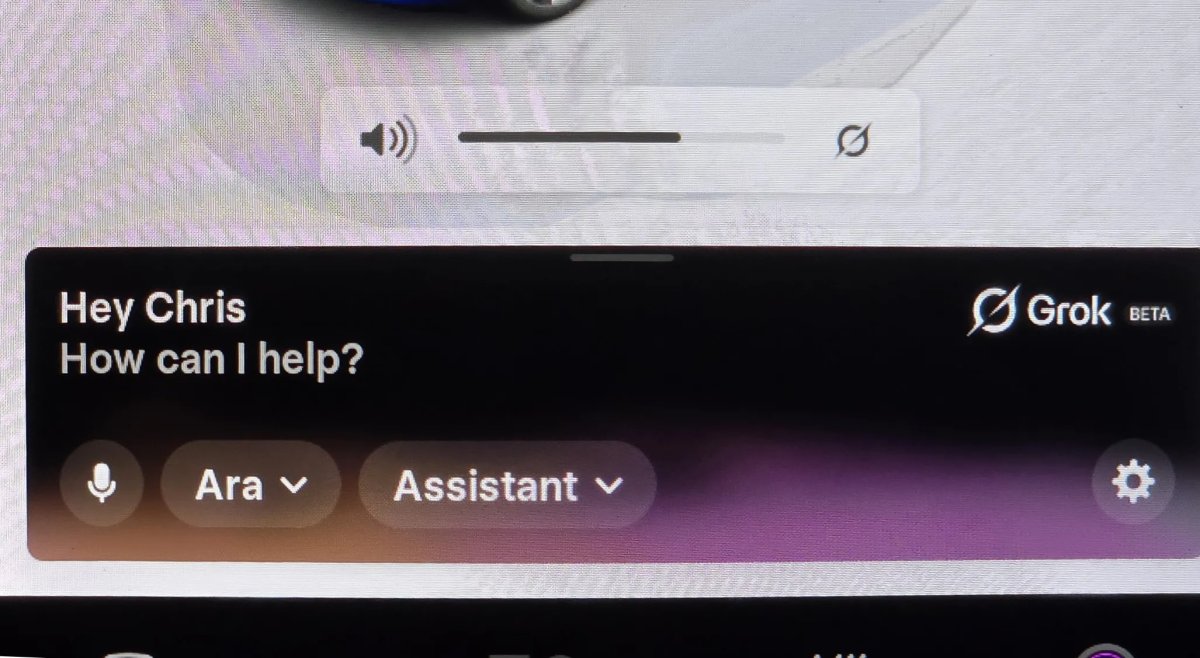
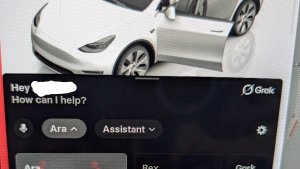
Grok AI Assistant
The star of the Summer Update is Grok, xAI’s conversational AI assistant, which has now landed in Tesla vehicles. For now, it's available in any Tesla that has an AMD processor and is potentially coming to Intel-based vehicles in the near future. The feature is also only available in the U.S., but it’s expected to expand to other regions — hopefully soon.
Grok is in its first iteration as an in-vehicle assistant, and for now, cannot control the vehicle, which means that Tesla’s voice command system is still intact. However, there is a lot it can do already. Grok is activated by pressing and holding the voice button (right scroll wheel on older vehicles), while a short press of the button is still reserved for voice commands. Grok will support a wake word in the future, letting you activate it without pressing a button.
You don't need to sign into Grok to use it in your Tesla!
It can't currently control anything in the car, but it does seem context aware that it is in a vehicle. pic.twitter.com/IpatR7sjiJ
Once Grok is open, which can also be done by tapping the Grok app icon, users can tailor the AI personality according to their preferences by selecting a persona and voice of their choice.
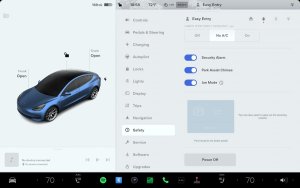
There are also several other settings for Grok under the settings button. You can enable NSFW mode, Kids Mode, or disable access to your vehicle’s location.
Grok has contextual awareness of your vehicle location, which means it can provide relevant answers to questions like “Where should I go for dinner?”
Logging In Not Required
Grok is free with Premium Connectivity, or if you’re using your phone’s hotspot feature or connected to WiFi, so anyone can try it for free. In fact, you don’t even need to log in to start using Grok. However, logging in adds some additional features.
If you’d like to log in, you can do so by scanning the QR code in the vehicle, which will provide chat management and transcripts, SuperGrok access (if you pay for a subscription), and better privacy control.
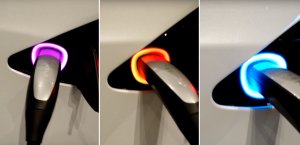
Tesla has added a new Light Sync feature that pulses the vehicle’s ambient lighting in sync with the music being played. This option is turned on under Toybox > Light Sync. There are also a few options, including the ability to match the ambient light colors to the album’s artwork, instead of using your selected color.
In addition, in Park you can enable Rave Cave when parked, which cranks up the ambient lighting brightness to the maximum.
Dashcam App Update
The Dashcam app now allows you to adjust playback speeds, just like the older Dashcam Viewer, which is still used on Intel-based vehicles.
In addition to adjusting playback speed, you can now adjust the video view so that it’s displayed without being obstructed by the buttons at the top (video below). The difference is small, but could be useful if you’re trying to see something slightly out of view or that’s hidden behind the top Dashcam buttons.
While the Cybertruck has also received the updated Dashcam Viewer with this update, it does not have the new B-pillar camera recordings like other HW4 cars.
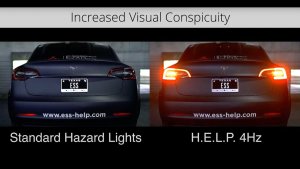
Sentry Mode is getting one of the best uses of the vehicle’s ambient lighting that we’ve seen so far. The ambient lighting will now slowly pulse red while Sentry Mode is activated to grab someone’s attention, instead of just relying on the vehicle’s display.
While you can disable Sentry Mode sounds, we’d love to see an even more stealthy Sentry Mode that also disables the ambient lighting and screen, allowing the vehicle to record without anyone being aware.
Since the ambient lighting is being used in this case to make people more aware of a feature, Tesla could also use it in other modes, such as Dog Mode.
There are a lot of potential uses for ambient lighting. Tesla can make it glow while the vehicle is charging, with the brightness potentially related to the vehicle's charge level.
When you navigate to a Supercharger, new icons in the charger list will indicate locations that require valet service or pay-to-park access.
Upon arrival at the location, a notification will appear on your screen, displaying important details such as access codes, parking restrictions, level/floor information for parking garages, and restroom availability. This information will also be available on the site card in the navigation.
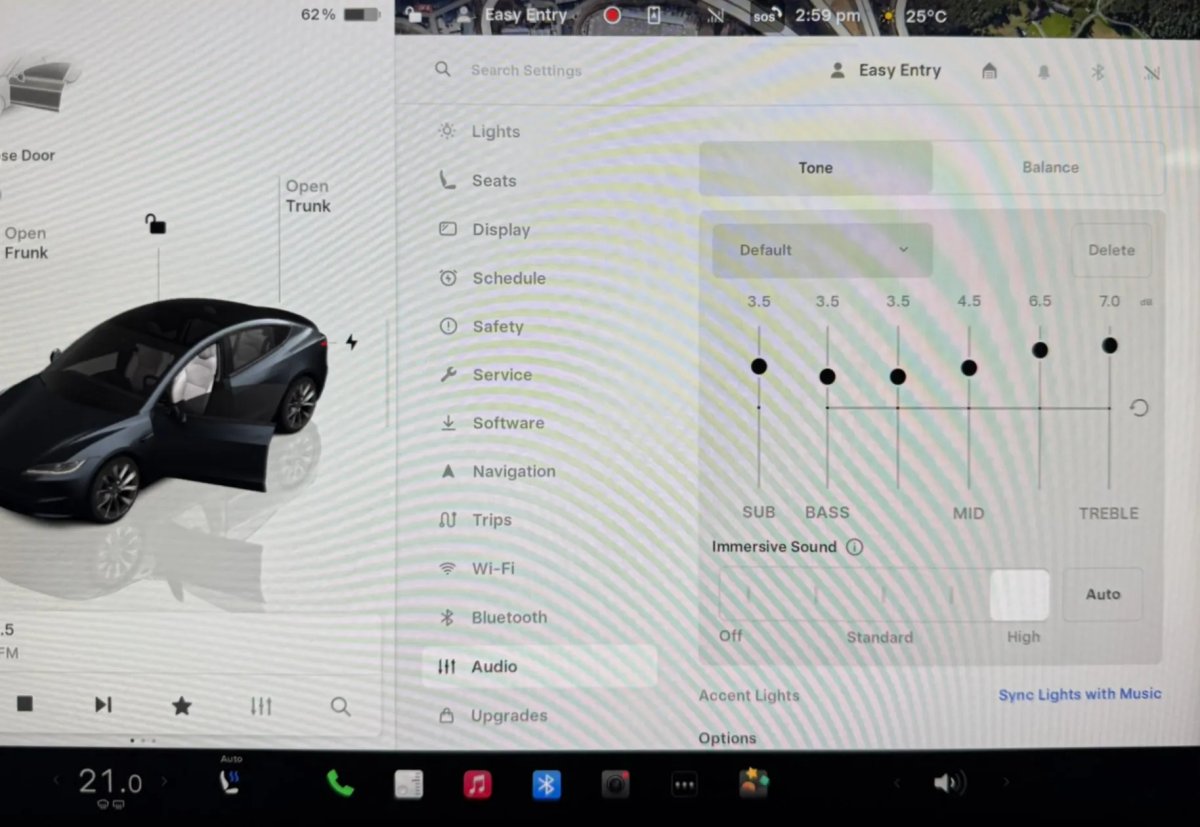
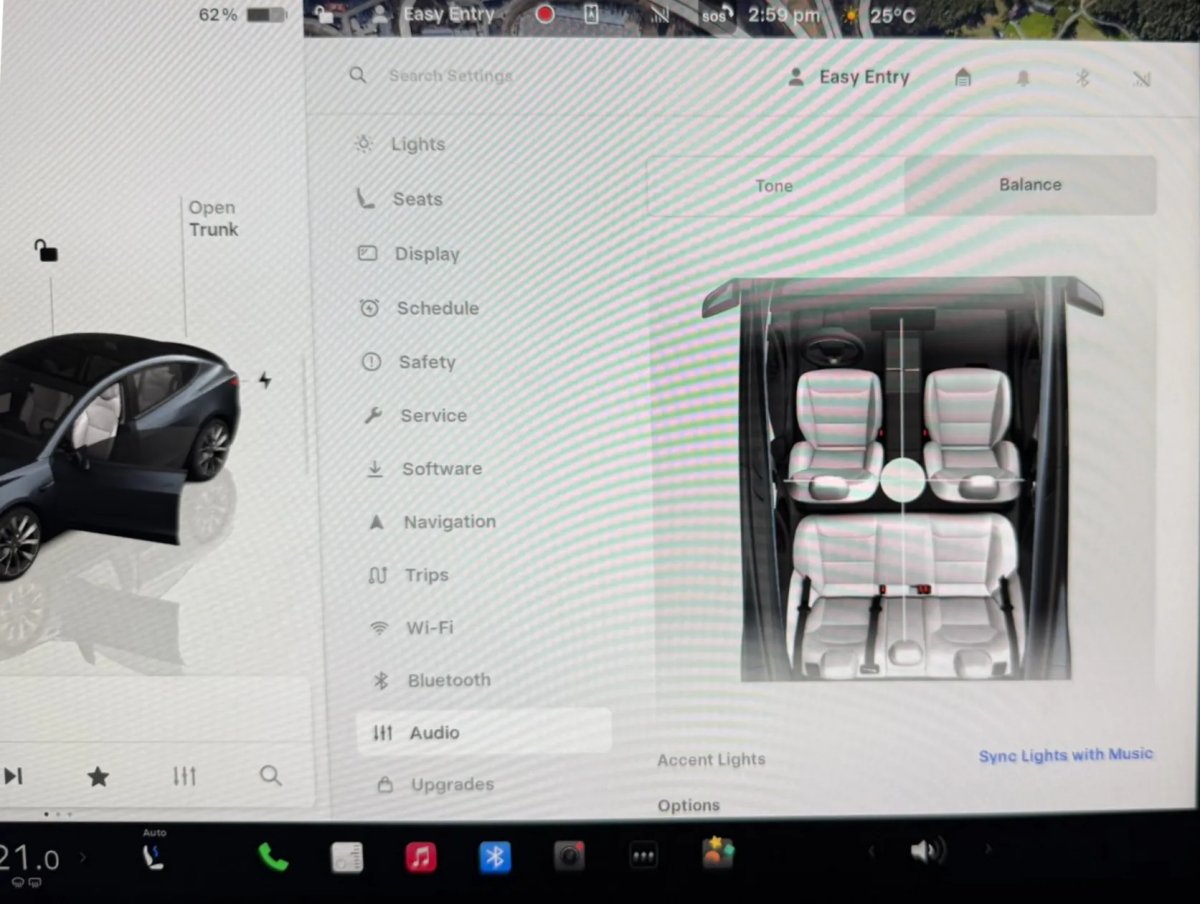
Equalizer Presets
max_bracco/X
Tesla has moved the audio settings from the music player, directly into the vehicle settings — making them much easier to find. In addition to creating a new “Audio” section in settings, you can now create and save equalizer presets.
Each preset can have a name, custom EQ settings, and a setting for immersive audio.
max_bracco/X
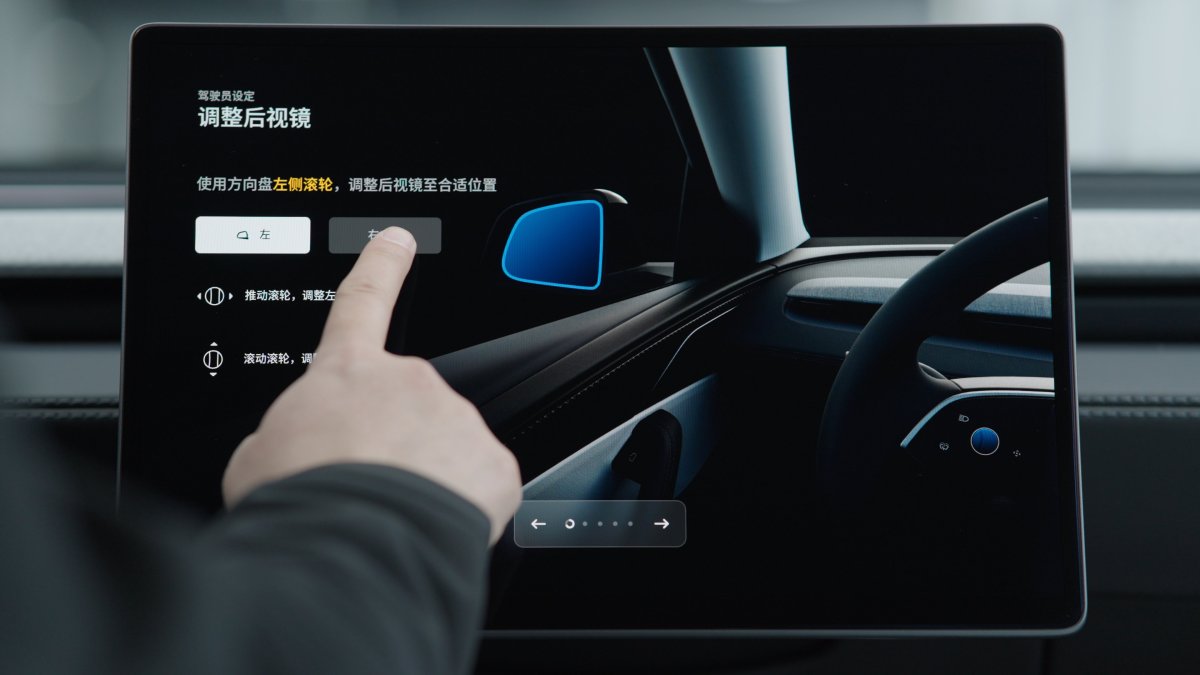
Onboarding Guide
Not a Tesla App
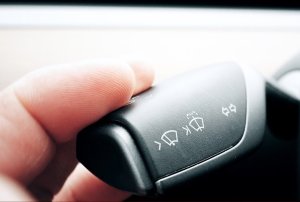
Tesla has introduced a new Onboarding Guide for new owners. The guide covers driver settings, touchscreen use, steering wheel and seat setup, and how to control key portions of the vehicle, including lights, wipers, and Autopilot features.
The Onboarding Guide is automatically initiated when a new owner accepts delivery of a Tesla, or can be manually initiated at any time by going to Controls > Service > Onboarding Guide.
This appears to only be available for the new Model 3 and new Model Y.
In typical Tesla fashion, this 2025.26 update is rolling out gradually in small waves initially. Three waves have already gone out, so all signs are looking good for it going into a wide release soon.


![First Look at Tesla’s 2025.26 Update [Photos + Videos]](https://www.notateslaapp.com/img/containers/article_images/2025/grok-app.webp/f66c0424fde99ab9adb2b041d854f723/grok-app.jpg)


![Andrej Karpathy considers returning to Tesla to work on Optimus [video]](https://www.notateslaapp.com/images/news/2022/karpathy-podcast_300w.jpg)